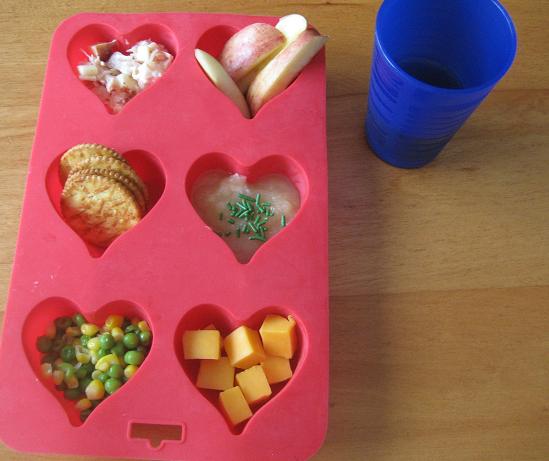
Related Posts Plugin for WordPress, Blogger...

This post is linked to Mrs. Matlock’s Alphabe Thursday! It is “O” week.


How to Make a Cardboard Sled

When the snow arrived last week, we found ourselves without a sled. With the amount of snow, we get each year it never occurred to us to buy one for JDaniel. Thankfully I remembered using cardboard sled during a Let’s Pretend session at the library in the fall. Once I had gathered the materials it was so easy to put together.
Materials:
  • 4 or 5 feet of rope or clothesline
  • A cardboard box
  • A pencil
  • A yardstick

Directions:

    1. Fold a cardboard box flat (Having 2 layers adds strength to the sled)
    2. Using a yardstick mark seven inches from the front of the box on the left and right sides with a pencil. (This will be where the rope enters the sled from the handle.)
    3. Using a yardstick mark seventeen inches from the front of the box on the left and right sides with a pencil. (This will where the handle begins.)
    4. Using a yardstick mark twenty-two inches from the front of the box on the left and right sides with a pencil. (This will be where the handle ends.)
    5. Using a yardstick mark twenty-four inches from the front of the box on the left and right sides with a pencil. (This will be where the rope comes back up from the underside of the sled so that it doesn’t drag and slow the sled down.

  1. Using a knife or scissors carve a hole of about two inches just inside each of the marks.
  2. Fold the rope in half in front of the sled to ensure you will have the same amount of rope threaded through both sides of the cardboard.
  3. Beginning on the left-hand side thread the rope down through the first hole.
  4. Thread the rope up through the second hole and then down through the third. Leave enough of the rope sticking up between the second and third holes to create a handle.
  5. Thread the rope up through the fourth hole and tie a loose knot to keep the rope in place.
  6. Repeat steps 8-10 on the right side of the sled.
  7. Adjust the tension of the rope under the sled to keep the rope as tight on under section as possible while still having comfortable handles and enough rope for the handle to pull.
  8. Tighten the knots above the fourth holes when the rope is as you would like it.


This post is linked to ABC and 123: Show and Tell and Show and Tell Saturday.


Muffin Tin Monday- The Weather Outside Was Frightful!

Well, the weather outside was frightful but, the lunch inside was delightful. We had snow! We had snow! We had snow! With all the snow and ice we had in South Carolina I went with a snow and ice theme for the muffin tin.
I started a simple turkey and cheese sandwich cut it out with a snowman cookie cutter. The scraps from the sandwich were placed in the adjacent muffin cup. The second row contains snowman parts. The carrots could be used for a snowman’s nose and olives that could be used for a snowman’s eyes or smile. The third row contains popcorn puffs of snow and lemon ice chunks.
The lemon ice contains juice from the last of the lemons I received from Mrs. Matlock. It was sour and sweet rolled into one.
Here is the recipe for the lemon ice:


Ingredients:
2 cups of water
1 cup of sugar
Pinch of salt
2/3 cup of lemon juice (from about 4 lemons)
 Directions:
  1. Bring the water, sugar, and salt to a simmer over high heat and stir until you no longer see the sugar. Take off heat and stir in lemon juice.
  2. Pour into a 9×13 pan and cool from 15 minutes.
  3. Cover the pan with plastic and place in the freezer for one hour.
  4. Take the pan out of the freezer and scrape lemon ice from edges to the center of the pan.
  5. Return the pan to the freezer and freeze one more hour.


 This post is linked to Muffin Tin Monday.